The Ultimate Guide to Winged Eyeliner
Understanding Your Eye Shape
Selecting the perfect winged eyeliner hinges on recognizing your eye shape. Knowing whether your eyes are almond-shaped, round, or have a downturned outer corner lets you customize the wing's angle and placement for a natural, flattering effect. A strategically drawn wing can transform your eyes, making them appear more awake and alluring. Take time to observe your eye structure before picking up the liner.
Each eye shape benefits from distinct wing approaches. Round eyes gain elongation from slightly bolder wings, while almond eyes might only need delicate flicks to highlight their symmetry. Don't hesitate to try multiple styles - sometimes unexpected combinations yield stunning results that complement your unique features perfectly.
Mastering the Wing Technique
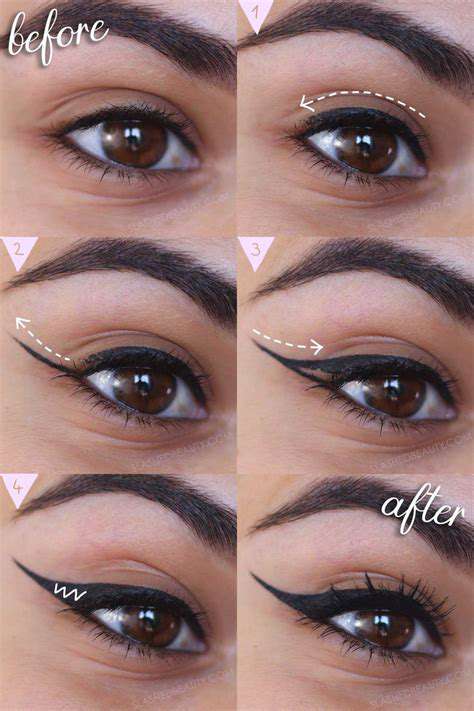
Creating the ideal wing demands patience and proper methodology. Begin by sketching a clean line following your upper lash line, then extend it outward with an angle that mirrors your eye's natural contour. The difference between messy and magnificent lies in your attention to detail. Build your technique gradually, starting with modest flicks before attempting more dramatic statements.
Variation proves essential in wing mastery. Test different lengths and angles during practice sessions - what works for a daytime look might not suit evening glamour. Remember that even makeup artists needed countless attempts before achieving consistency. Your persistence will pay off in smoother application and more confident strokes.
Choosing the Right Winged Eyeliner
Eyeliner selection dramatically impacts your wing's precision and longevity. While liquid formulas offer unbeatable sharpness, they require steady hands. Gel alternatives provide richer pigmentation for bold statements, though they may need brush expertise. Texture, shade, and applicator design collectively determine your success rate. Test various products to find your perfect match.
Consider your lifestyle when selecting formulas. Office workers might prioritize smudge-proof options, while performers could prefer buildable intensity. Don't overlook less conventional colors - deep burgundies or chocolates can create stunning dimension while remaining wearable for various occasions.
Tips for Applying Winged Eyeliner
Successful application begins with preparation. Always start with primed lids to prevent midday fading or transfer. This preparatory step often separates amateur attempts from professional-looking results. Choose tools that match your skill level - fine-tipped pens suit beginners, while brush enthusiasts might prefer the control of angled liners.
For extended wear, consider setting your wings with matching eyeshadow. Building your wing through connected dots rather than continuous lines reduces mistakes and allows for easy corrections. Always check symmetry with eyes open and relaxed - some adjustments only become visible in natural expressions.
Mastering the Technique: Steps to a Perfect Wing
Understanding the Foundation
Exceptional wings require proper groundwork. Prepping the eye area creates the ideal canvas, ensuring smooth application and extended wear. Clean, moisturized lids allow for seamless liner glide, while specialized primers prevent the dreaded midday fade. These preparatory minutes save frustration later when your wings remain impeccable from morning coffee to evening events.
Choosing the Right Tools
Tool quality directly influences your wing's precision. Invest in a high-performance liquid liner with flexible yet firm bristles for controlled flicks. Angled brushes work wonders for gel applications, allowing both thin hairlines and bold strokes from the same product. Keep tools clean and properly stored - dried product residue or misshapen bristles can sabotage even advanced techniques.
Mastering the Basic Wing
The classic wing begins by visualizing an invisible line extending from your lower lash line's outer corner. Use this as your guide for angle placement. Start with small dashes rather than attempting one continuous stroke - this connect-the-dots method yields cleaner results. Remember that wings should enhance your natural eye shape, not fight against it. What looks striking on others might need adjustment for your unique features.
Adding Depth and Dimension
Elevate basic wings through strategic layering. Apply your initial line thinly, then gradually build thickness where desired. For smoky-wing hybrids, softly smudge the outer edges with a detailing brush. Consider using a slightly darker shade at the wing's tip to create subtle ombré effects that add professional polish to your look.
Refining the Wing Shape
Precision refinement separates good wings from great ones. After initial application, step back and assess symmetry with your eyes open and relaxed. Use concealer on a flat brush to sharpen edges or correct unevenness. The most flattering wings follow an imaginary line extending from your lower lash line - this natural guideline ensures harmonious proportions.
Troubleshooting and Refinement
Every artist encounters challenges. For uneven wings, try applying liner with your eyes open rather than closed. If wings appear too sharp, soften edges with a cotton swab dipped in makeup remover. Remember that makeup should enhance your confidence - sometimes the imperfect wing actually creates the most interesting, personalized look.
Read more about The Ultimate Guide to Winged Eyeliner


![Review: [Specific Clothing Brand] Quality and Fit](/static/images/29/2025-05/ValueProposition3AIsthePriceJustified3F.jpg)


Hot Recommendations
- Grooming Tips for Your Bag and Wallet
- Best Base Coats for Nail Longevity
- How to Treat Perioral Dermatitis Naturally
- How to Use Hair Rollers for Volume
- How to Do a Graphic Eyeliner Look
- Best DIY Face Masks for Oily Skin
- Guide to Styling 4C Hair
- Guide to Improving Your Active Listening Skills
- How to Fix Cakey Foundation
- Best Eye Creams for Wrinkles