Best Contouring Products for Beginners
Choosing the Right Cream Contouring Products
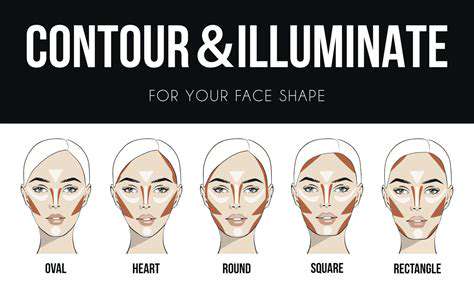
Finding your perfect contour match requires considering both shade and formula. Go one to two shades deeper than your natural skin tone - anything darker risks looking muddy. Texture matters equally; lightweight, blendable formulas prevent that dreaded makeup mask effect while still delivering definition.
The best cream contours double as skincare. Many now include hydrating ingredients like hyaluronic acid or vitamin E, ensuring your makeup enhances rather than stresses your skin. These multitasking products create definition while actually improving your complexion over time.
Applying Cream Contour
Start with a light hand - you can always build intensity. Dot product along the hollows of cheeks, hairline, and jawline, then blend upward. This technique lifts features naturally. For nose contouring, apply two parallel lines and blend outward, never downward, to avoid widening the effect.
Temperature affects application. Warm the product slightly between fingers first for easier blending. In cooler months, consider placing your contour stick in your bra for a minute before application - this little trick makes the formula more malleable.
Blending Techniques for a Natural Finish
The secret weapon? A slightly damp beauty sponge. Bounce rather than drag to diffuse edges perfectly. For precision areas like nose contours, a dense, angled brush gives control. Always blend edges more than the center - this creates natural shadow fall-off.
Direction matters more than you think. Blend cheek contour upward toward ears to lift, downward blending can drag features. Circular motions work best for forehead and jawline to avoid obvious lines.
Highlighting for a Three-Dimensional Look
Strategic highlighting completes the illusion. Apply luminous creams to cheekbone peaks, brow bones, and cupid's bow. The contrast between matte contours and glowing highlights creates stunning dimension. For daytime, stick to pearlized (not glittery) formulas that catch light subtly.
Placement creates optical illusions. A dot of highlighter at the outer eye corners widens eyes, while a subtle chin highlight balances facial proportions beautifully.
Maintaining a Smooth Contour
Lock in your masterpiece with a translucent powder applied with a fluffy brush - just a light dusting preserves the cream's natural finish while preventing shine. For oily skin, a mattifying primer first creates the perfect canvas.
Midday touch-ups require finesse. Instead of adding more product, use a clean sponge to gently re-blend any areas that have faded or shifted. This refreshes without buildup.
Alcohol withdrawal manifests differently across individuals, necessitating personalized approaches.
Blending Brushes: The Unsung Heroes of Contouring
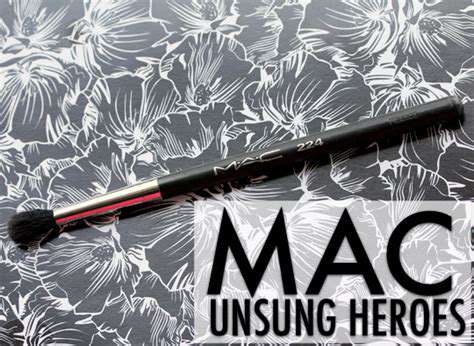
Blending Brushes: A Vital Tool for Smooth Transitions
Often overshadowed by flashier tools, quality blending brushes make or break a contour. The right brush transforms application from obvious stripes to subtle shadows. Their importance becomes clear when you see how they seamlessly marry product to skin, creating that elusive is it makeup or just great bone structure? effect.
Different shapes serve distinct purposes. Angled brushes carve precise cheek contours, while fluffy domed brushes diffuse product beautifully. The bristle material changes everything - synthetic works best with cream formulas, preventing product absorption and streaking. Investing in brush education pays dividends in application quality.
Choosing the Right Blending Brush
Consider both the product type and your skill level. Beginners benefit from shorter, denser brushes offering more control. Advanced users might prefer longer, looser bristles for airbrushed effects. The handle weight matters too - heavier handles provide stability for detailed work.
Natural hair versus synthetic isn't just about ethics. Natural bristles (like goat hair) excel with powder products, while synthetic options (typically nylon) outperform with creams. The perfect brush feels like an extension of your hand - balanced, comfortable, and responsive to subtle pressure changes.
Techniques for Blending Mastery
Develop a bouncing technique - lightly tapping rather than dragging prevents product displacement. Always clean brushes between uses; residual product alters blending quality dramatically. For cream products, slightly warming the brush first (by rubbing between palms) improves blendability.
Pressure control separates amateurs from pros. Start with feather-light touches, increasing pressure only as needed. Remember: you can always add more product, but removing over-application without starting over is nearly impossible. Developing this sensitivity takes practice but creates flawless results.
Read more about Best Contouring Products for Beginners
![What to Wear on a Plane [Comfortable & Stylish]](/static/images/29/2025-05/ChooseFabricsWiselyforMaximumComfort.jpg)
![Review: [Specific Maternity Clothing Brand] Comfort and Style](/static/images/29/2025-05/ValueforMoney3AAWorthyInvestment3F.jpg)

![Best Jeans for Every Body Type [Find Your Fit]](/static/images/29/2025-05/AppleShapes3AFindingJeansThatBalanceYourSilhouette.jpg)


![Best SPF for Face: Protecting Your Skin Daily [2025]](/static/images/29/2025-05/BeyondSPF3ASupportingHealthySkinHabits.jpg)