Contour and Highlight Tutorial for Beginners
Thorough blending creates invisible transitions between shades. This meticulous process ensures no harsh lines remain visible, making the enhancement appear as natural shadows rather than applied makeup. The final effect should subtly redefine rather than obviously redraw your features.
Illuminating Key Features
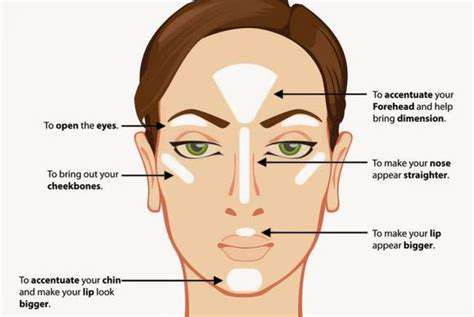
Strategic illumination complements shadow work beautifully. Lighter shades bring forward high points like cheekbones, brow arches, nasal bridges, and cupid's bows. This interplay of light and shadow creates dimensional depth that flat makeup cannot achieve.
Precise placement of illuminators elevates the entire effect. Select a shade slightly lighter than your skin with subtle reflective properties for natural radiance. Blend as carefully as you did the contour shades, ensuring seamless integration with your base complexion.
Maintaining Authenticity
The hallmark of excellent facial sculpting lies in its subtlety. Over-application creates theatrical rather than refined results. The objective remains enhancement, not transformation - working with your existing features rather than against them.
Lighting conditions dramatically affect visible results. Always apply and check your work in lighting similar to where you'll be seen. Natural daylight provides the most honest assessment, while evening lighting might require slight adjustments.
Contemporary mindfulness practices share surprising parallels with makeup artistry - both require present-moment awareness and attention to subtle details for optimal results.
Accentuating Natural Assets
Selecting Complementary Shades
Shade selection forms the foundation of natural-looking enhancement. Your skin's undertones significantly influence how shades appear once applied. Cooler complexions generally suit ashy contours, while warmer skins benefit from taupe-based products. Illuminators should complement rather than contrast with your natural coloring.
Test products along your jawline rather than your hand for accurate matching. The right highlighter imparts luminosity without obvious sparkle, creating the illusion of light catching your features rather than makeup sitting on your skin.
Working With Facial Architecture
Every face possesses unique contours that guide product placement. Study how light naturally interacts with your features - where shadows naturally fall and which areas catch light. This observation informs where to apply sculpting and illuminating products for most authentic results.
Visualization proves crucial before application. Imagine how sunlight would naturally highlight and shadow your face, then replicate this effect with your products.
Application Methodology
Build products gradually rather than applying heavily at once. Start with minimal product on your brush, tapping off excess before application. Concentrate product placement then diffuse outward for controlled, buildable coverage.
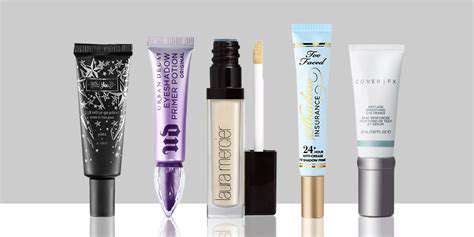
Quality tools make application significantly easier. Invest in a few well-made brushes specifically designed for detailed work - their precision will repay the investment through superior results.
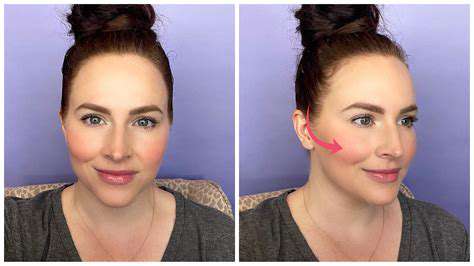
Strategic Highlight Placement
Highlighting follows the same less is more philosophy as contouring. The most effective illumination appears as natural skin luminosity rather than obvious makeup. Concentrate on areas where light naturally hits first: the highest points of your facial landscape.
Blend highlights gently into surrounding areas to avoid stark contrasts. The transition from illuminated to natural skin should be imperceptible to the casual observer.
Tool Selection and Maintenance
Different techniques require specific tools. Fluffy brushes excel at diffusing powder products, while damp sponges work better with creams. Clean tools regularly - product buildup compromises application quality and can harbor bacteria.
Rotate brushes during application - use separate ones for contour, highlight, and blending to prevent muddied results.
The Art of Seamless Blending
Blending transforms separate applications into cohesive enhancement. Use light, circular motions with minimal pressure - let the brush bristles do the work. Pay particular attention to edges where products meet bare skin.
Periodically step back from the mirror to assess overall effect. What looks blended at close range might appear patchy from normal viewing distances.
Finishing and Setting
Light setting powder locks everything in place without diminishing dimensional effects. Apply with a fluffy brush using a pressing rather than sweeping motion to avoid disturbing underlying products.
Remember that practice and patience yield the best results. Each application provides valuable experience that informs future attempts. Document what works through photos to track your progress over time.
Achieving Invisible Transitions
Blending Philosophy
Masterful blending creates the illusion of naturally occurring shadows and highlights. The technique involves more than simply smoothing edges - it requires understanding how light interacts with three-dimensional forms. Study classical portraiture to observe how masters depicted facial contours through light and shadow.
The most successful blending makes the technique undetectable. When done properly, observers should notice enhanced features rather than visible makeup application.
Tool Varieties and Uses
Different tools create distinct blending effects. Dense brushes provide more control for precise areas, while airy brushes create softer diffusions. Experiment with various densities and shapes to discover which tools work best for different facial zones.
Temperature affects blending too. Slightly warming cream products makes them more blendable, while cool-toned powders often require firmer blending to avoid ashy appearances.
Technical Execution
Develop a systematic blending approach. Work from the center of application outward, using progressively lighter pressure as you move toward the edges. Change blending directions periodically to ensure even distribution.
Pay special attention to transition areas where multiple products meet. These zones require the most careful blending to prevent visible demarcation lines.
Read more about Contour and Highlight Tutorial for Beginners


![Best Makeup Brushes You Need [2025]](/static/images/29/2025-05/MasteringConcealerApplicationwiththeRightBrushes.jpg)


Hot Recommendations
- Grooming Tips for Your Bag and Wallet
- Best Base Coats for Nail Longevity
- How to Treat Perioral Dermatitis Naturally
- How to Use Hair Rollers for Volume
- How to Do a Graphic Eyeliner Look
- Best DIY Face Masks for Oily Skin
- Guide to Styling 4C Hair
- Guide to Improving Your Active Listening Skills
- How to Fix Cakey Foundation
- Best Eye Creams for Wrinkles