How to Do a Graphic Eyeliner Look
Creating Different Graphic Eyeliner Styles
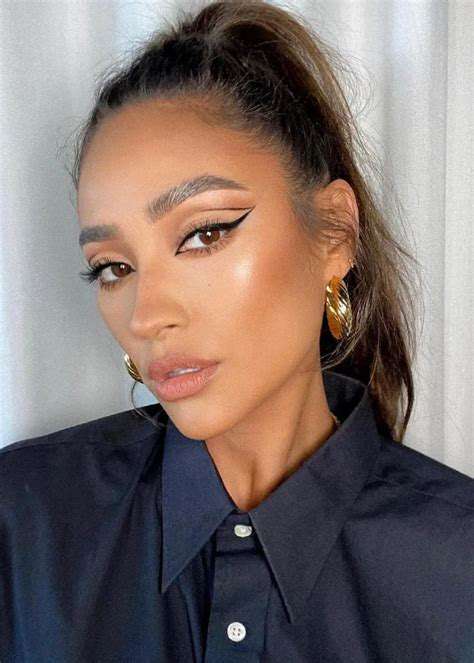
Winged Eyeliner
Achieving a classic winged eyeliner look is a fundamental step in graphic eyeliner artistry. The key to a well-executed wing is precision. Start by drawing a straight line from the outer corner of your eye, extending towards the temple. Then, subtly curve the line upwards and outwards, creating a pointed wing. Practice makes perfect, and experimenting with the length and angle of the wing will allow you to find the style that best suits your eye shape. A good quality eyeliner pen or liquid eyeliner is essential for achieving sharp lines and a clean finish.
For a more dramatic look, extend the wing further out. For a more subtle effect, keep the wing closer to the eye. Be sure to blend the wing into the outer corner of your eye for a seamless finish. Remember to use a small brush or cotton swab to clean up any mistakes or smudges. Consistency and practice will help you master this essential graphic eyeliner technique.
Cat-Eye Eyeliner
The cat-eye is a timeless graphic eyeliner style that adds a touch of sophistication and allure. It involves creating a dramatic upward flick at the outer corner of the eye, drawing the eye outward and elongating the lash line. The angle of the flick can be adjusted to suit different eye shapes and preferences. Start by applying a thin line along the upper lash line, extending it outwards and upwards, creating a pronounced curve. This style often requires a bit of practice to achieve the perfect angle and curve.
Experiment with the thickness of the line to achieve different effects. A thinner line will give a more subtle cat-eye, while a thicker line will create a bolder statement. To ensure the eyeliner stays in place throughout the day, consider using an eyeliner primer or setting spray. Using a mirror and paying close attention to detail will help you master the cat-eye look.
Smoky Eyeliner
The smoky eye is a popular graphic eyeliner style that features a blend of various shades of eyeliner and eyeshadow, creating a soft, diffused effect around the eyes. It's a great way to add depth and dimension to your look, and it’s often paired with a bold lip or a neutral palette. Start by applying a base shade of eyeshadow all over your eyelid. Then, use a darker shade to create a smoky effect along the upper lash line. Gently blend the shades together to avoid harsh lines.
Use a smudging brush to blend the eyeshadow and eyeliner seamlessly, creating a soft gradient effect. The intensity of the smoky effect can be adjusted by varying the shades of eyeliner and eyeshadow used. A good quality smudging brush is essential for achieving a smooth and seamless transition between the shades. Remember to keep blending until the desired smoky effect is achieved.
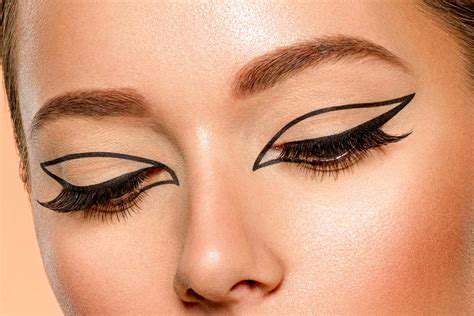
Geometric Eyeliner
Geometric eyeliner designs are becoming increasingly popular, allowing for creative expression and unique eye looks. These looks can range from simple shapes like triangles and squares to more intricate patterns. The key is precision and attention to detail. Start with a well-defined base, using a sharp eyeliner pencil or liquid liner to create precise lines. Use a ruler or other straight edge to ensure accuracy when creating geometric shapes. Experiment with different combinations of lines and shapes to discover your personal style.
For intricate patterns, consider using a stencil or tracing template to guide your lines. To keep the design in place, use an eyeliner primer or a setting spray. The possibilities are endless with geometric eyeliner; let your creativity guide you as you discover the unique look that best suits you. Remember that practice and experimentation are key to mastering this type of graphic eyeliner design.
Tips and Tricks for Achieving Precision
Mastering the Foundation
Before you even think about the intricate details of a graphic eyeliner look, ensuring a solid foundation is crucial. Properly prepped skin provides a smooth canvas for your eyeliner to glide on effortlessly. This means using a good quality primer to minimize any texture or oiliness. A smooth base will also prevent your eyeliner from smudging or feathering, ultimately allowing you to achieve a more precise and long-lasting look.
Make sure your eyelids are completely dry before applying any makeup. A damp eyelid can cause your eyeliner to run or bleed, which will impact the precision of your graphic look. Additionally, using a concealer to cover any blemishes or dark circles will give your eyeliner look a more polished and even appearance.
Choosing the Right Tools
The tools you use can significantly impact the precision of your graphic eyeliner look. A high-quality, fine-tipped eyeliner brush or a gel liner with a very fine applicator will allow you to create precise lines and intricate details. Experiment with different types of applicators to see which one best suits your style and skill level.
A good quality, sharp angled brush will help in creating sharp, clean lines and precise flicks. Consider using a makeup blending brush for smoothing out any sharp edges or mistakes you might make during application.
Practicing Your Hand
Achieving precision with graphic eyeliner takes practice. Start with simple lines and gradually increase the complexity of your designs. Practice on your non-dominant hand to build your muscle memory and get comfortable with the tool. Don't be afraid to make mistakes; they are a part of the learning process.
Practicing in front of a mirror with good lighting is essential. This will allow you to see exactly how the eyeliner is applied and if any corrections need to be made. Don't be discouraged if your first few attempts aren't perfect; keep practicing and you'll see improvement over time.
Precision in Application
Applying your eyeliner in small, controlled strokes is key to achieving precision. Don't rush the process. Take your time, and focus on creating clean, defined lines. Use light pressure, especially when working with gel or liquid liners.
Consider using a ruler or a small straight object to help guide your hand and maintain straight lines, especially for winged eyeliner or other geometric shapes. This will help you to achieve a more uniform and even look.
Using a Mirror Strategically
A well-placed mirror is crucial for achieving precision in graphic eyeliner. Use a mirror that allows you to see the entire eyelid area clearly. A mirror that angles slightly to give you a better view of the area you're working on will help prevent any mistakes that could occur from not seeing the entire application process clearly.
Consider using multiple mirrors to achieve a 360-degree view, giving you a complete perspective of the application process. This is especially helpful when creating intricate details or winged eyeliner looks.
Experimenting with Different Styles
Once you've mastered the basics of precision, it's time to experiment with different graphic eyeliner styles. Explore different shapes, colors, and patterns. You can create everything from subtle cat-eye flicks to bold winged liner looks or even more intricate designs. Look for inspiration from your favorite makeup artists or influencers.
Troubleshooting Common Issues
Even with practice, you might encounter some common issues when trying to achieve precision with graphic eyeliner. If your eyeliner is smudging, make sure your eyelids are completely dry and use a good quality primer to prevent this. If you're having trouble with straight lines, use a ruler or other straight objects to help guide your hand. If your eyeliner looks uneven, try applying it in small, controlled strokes and ensuring you're applying even pressure.
If your eyeliner is too thick, use a makeup remover to gently wipe away the excess product. If you're struggling to maintain the shape of your eyeliner, practice the application in front of a mirror. Remember that precision takes practice and patience. Don't get discouraged if it doesn't look perfect right away.
Read more about How to Do a Graphic Eyeliner Look


Hot Recommendations
- Grooming Tips for Your Bag and Wallet
- Best Base Coats for Nail Longevity
- How to Treat Perioral Dermatitis Naturally
- How to Use Hair Rollers for Volume
- How to Do a Graphic Eyeliner Look
- Best DIY Face Masks for Oily Skin
- Guide to Styling 4C Hair
- Guide to Improving Your Active Listening Skills
- How to Fix Cakey Foundation
- Best Eye Creams for Wrinkles