Guide to Doing Gel Nail Extensions at Home
Assessing Your Current Nail Condition
Before diving into the world of gel extensions, take a moment to carefully evaluate the state of your natural nails. Look closely for any visible damage like cracks, splits, or uneven surfaces, as these factors will significantly impact your extension results. This careful examination helps both you and your nail technician determine the most suitable application method, ultimately extending the lifespan of your enhancements. Proper nail assessment forms the foundation for a successful gel extension experience, preventing complications later on.
Consider both the current length and your preferred shape when planning your extensions. Whether you're working with short nubs or longer natural nails, each scenario requires different application techniques. The shape you desire - be it classic almond, modern square, or soft rounded - will directly influence the customization process. Clear communication with your technician about these preferences ensures you'll achieve your dream nail look.
Preparing Your Nails for Application
Meticulous nail preparation separates amateur results from professional-quality gel extensions. Begin by completely stripping away old polish and residues, creating a pristine canvas for the new application. Use a high-quality buffer to gently eliminate ridges and uneven textures, promoting optimal adhesion. This crucial step directly impacts both the durability and visual appeal of your final extensions.
Pay special attention to nail dryness before application. Even minimal moisture can compromise the gel's bonding strength, potentially causing premature lifting or complete detachment. Allow adequate drying time or use a dehydrator specifically designed for nail prep to guarantee superior adhesion.
Choosing the Right Tools and Products
Your toolkit makes or breaks your gel extension experience. Invest in professional-grade implements: precision clippers, multi-grit files, and ergonomic cuticle pushers. The buffer's grit quality particularly matters - finer abrasives create the ideal smooth surface without over-filing delicate nail plates.
When selecting gel products, prioritize formulations specifically engineered for extensions. These specialized adhesives and gels offer enhanced durability, dramatically reducing common issues like premature chipping or lifting. Quality products not only improve longevity but also protect your natural nails during wear and removal.
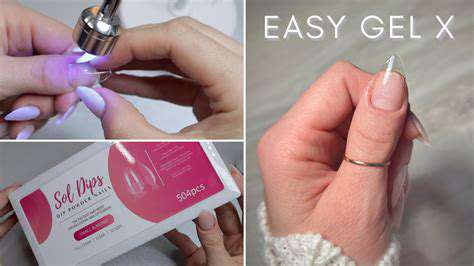
Understanding the Gel Extension Process
The extension process involves multiple precise steps, each contributing to the final result. Familiarizing yourself with this workflow helps you collaborate effectively with your technician and recognize proper technique. A professional will carefully prepare your nail bed, often including cuticle trimming and surface preparation, before meticulously applying and shaping each extension.
Curing represents another critical phase where UV or LED lamps polymerize the gel into its hardened, durable form. Understanding these stages helps you appreciate the craftsmanship involved and identify any procedural shortcuts that might compromise results.
Post-Application Care and Maintenance
Your gel extensions require thoughtful aftercare to maintain their beauty and integrity. Avoid exposing your nails to harsh chemicals, particularly acetone-based removers that can degrade the gel's structure. Instead, use gentle, extension-safe cleansers and regularly apply cuticle oil to maintain flexibility and prevent cracking.
Schedule maintenance appointments every 2-3 weeks for professional fills and adjustments. Between visits, clean under nails with soft brushes (never metal tools) and immediately address any lifting to prevent moisture intrusion. This proactive care extends your wear time while protecting your natural nails underneath.
Read more about Guide to Doing Gel Nail Extensions at Home
![Skincare Tips for Winter [Hydration Focus]](/static/images/29/2025-05/HydratingfromWithin3ATheRoleofDietandHydration.jpg)


![What to Wear to the Gym [Stylish & Functional]](/static/images/29/2025-05/AccessoriesThatEnhanceYourExperience.jpg)
![Best Facial Cleansing Brushes [Review]](/static/images/29/2025-05/Top-RatedCleansingBrushes3AOurExpertPicks.jpg)
![Skincare Routine for Beginners [Step by Step]](/static/images/29/2025-05/5AddressingSpecificConcerns28Optional293A.jpg)

Hot Recommendations
- Grooming Tips for Your Bag and Wallet
- Best Base Coats for Nail Longevity
- How to Treat Perioral Dermatitis Naturally
- How to Use Hair Rollers for Volume
- How to Do a Graphic Eyeliner Look
- Best DIY Face Masks for Oily Skin
- Guide to Styling 4C Hair
- Guide to Improving Your Active Listening Skills
- How to Fix Cakey Foundation
- Best Eye Creams for Wrinkles