How to Do a Simple Eyeliner Look

Preparing Your Eyes
Understanding Your Eye Shape
Before you even pick up your eyeliner, it's crucial to understand your eye shape. Knowing whether your eyes are round, almond-shaped, or have a different contour will help you choose the best eyeliner application technique and style. Different shapes look best with slightly different approaches. A well-chosen technique can enhance your natural beauty and highlight your best features. Consider how the shape of your eyes affects the placement of your eyeliner and the overall appearance you're trying to achieve.
Choosing the Right Eyeliner
The type of eyeliner you choose can significantly impact the outcome of your look. Liquid eyeliner offers a precise, sharp line, but it takes practice to master. Gel eyeliner provides a smooth, intense color, and is often a great option for beginners. Pencil eyeliner is versatile and easy to use, allowing for a soft, subtle line or a bolder look, depending on your preference. Experiment with different types to discover what works best for your skill level and desired effect.
Preparing Your Eyelids
Proper preparation is key to achieving a long-lasting and flawless eyeliner application. Start by cleansing your eyelids thoroughly to remove any dirt, oil, or makeup residue. Then, use an eyeshadow primer to create a smooth surface for your eyeliner to adhere to. This will help prevent smudging and ensure your look stays put throughout the day. A smooth canvas for your eyeliner will make a big difference in the final result.
Applying the Eyeliner
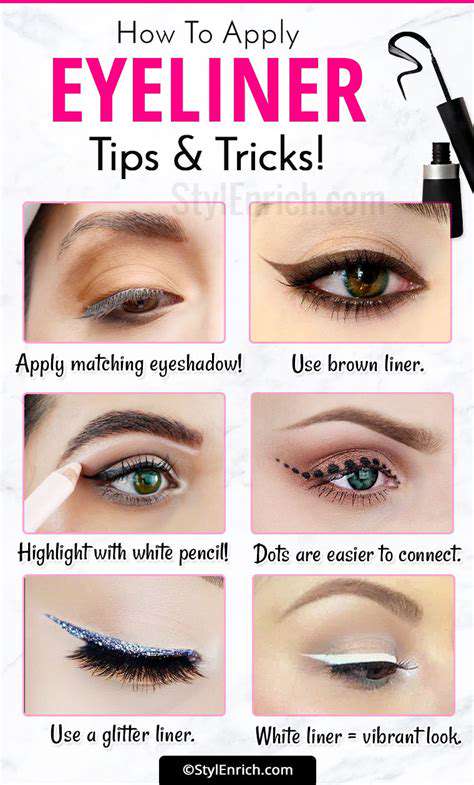
Once your eyelids are prepped, you can begin applying your eyeliner. For a natural look, start by applying a thin line along your upper lash line, drawing it outwards towards the outer corner of your eye. For a more dramatic look, you can thicken the line. If you are using liquid eyeliner, practice on a piece of paper to build your skills before going on your eyelids. Consistent and precise application is key to a professional look.
Practicing Different Techniques
Experiment with different eyeliner techniques to find what suits your style and skill level. Consider winged eyeliner for a more dramatic touch, or a cat-eye look for a classic elegance. These styles require practice, but with patience and dedication, you can master them. You can also try a simple, clean line for a subtle touch, or a more intense, bold look by layering the eyeliner. Don't be afraid to explore different styles and see what you like best.
Ensuring a Clean Finish
Once you've applied your eyeliner, take a moment to ensure a clean finish. Use a small brush or cotton swab to carefully remove any excess product or smudges. Checking your reflection in a mirror will help you ensure your eyeliner is evenly applied and looks natural. A clean, precise look is the goal. A final touch will complete your look and make it look flawless.
Creating a Smoky Eye Effect with Eyeliner
Choosing the Right Eyeliner
Selecting the right eyeliner is crucial for achieving a smoky eye. Consider the type of look you're aiming for and your eye shape. For a classic smoky eye, a liquid eyeliner is a good choice for precise lines, while a gel eyeliner can provide a bolder, more intense effect. A kohl-style eyeliner pencil is ideal for creating a softer, more subtle smoky effect, blending easily into the crease.
Experiment with different shades to find one that complements your eye color. A deep brown or black eyeliner will create a dramatic smoky effect, while a gray or taupe eyeliner can offer a more subtle, everyday look. Consider your skin tone and eye color when choosing a shade to avoid harsh contrasts.
Preparing Your Eyes
Before applying eyeliner, it's essential to prepare your eyes. Cleanse your eyelids thoroughly to remove any makeup residue or oil. Apply a primer to your eyelids, which will help the eyeliner adhere better and last longer. This step is crucial for a smooth, even application and a flawless smoky eye result.
Use an eyeshadow primer or a makeup setting spray to create a smooth base for your eyeliner and eyeshadow. This will help the makeup stay in place longer and prevent creasing, especially important for maintaining the smoky eye effect throughout the day.
Creating the Base with Eyeshadow
A crucial step in achieving a smoky eye is the eyeshadow application. Choose a neutral shade of eyeshadow, such as a taupe or gray, to create a base for the darker colors you will add. Apply the eyeshadow to your eyelids, blending it outwards towards your brow bone. This will give the smoky eye a natural and seamless look.
Using a blending brush, softly blend the eyeshadow into the crease of your eyelid. This step allows the color to seamlessly transition from the base shade to the darker color, creating the desired smoky effect. Remember to be gentle and work in small, circular motions to avoid harsh lines.
Applying the Smoky Liner
Now, it's time to apply the eyeliner. Start by applying a thin line of eyeliner along your upper lash line, starting from the inner corner of your eye and extending outwards. Use small, controlled strokes to create a smooth, even line.
Gradually build up the intensity of the eyeliner as you move towards the outer corner of your eye. This will help create the smoky effect. For a deeper smoky effect, use a smudging brush to blend the eyeliner towards the crease of your eyelid.
Blending and Smudging
Blending is key to achieving a natural and seamless smoky eye. Using a blending brush, gently smudge the eyeliner outwards towards the crease of your eyelid, creating a soft transition between the eyeliner and eyeshadow.
Use a smudging brush or a clean, damp cotton swab to blend the color along the lower lash line. This will create a fuller, more intense smoky effect while ensuring a cohesive look. Pay close attention to the outer corner to achieve the desired smoky effect. Avoid harsh lines or streaks.
Defining the Eyes
To complete the look, use a mascara to define your lashes. This will add depth and enhance the overall smoky eye effect. Apply mascara to both your upper and lower lashes, ensuring even coating to make your eyes pop.
Consider adding a touch of highlighter to the inner corner of your eye or brow bone for an extra touch of dimension and brightness. This will further enhance the smoky eye look and make your eyes appear more open and captivating.
Finishing Touches
Once you've applied the eyeliner, eyeshadow, and mascara, take a step back to assess the overall look. Are there any areas that need more blending or definition? Adjust as needed. Ensure that the colors blend seamlessly for a natural look. A light touch and precise application will ensure the smoky eye is long-lasting.
Finally, use a setting spray to set your makeup in place. This will prevent smudging and ensure that your smoky eye look stays perfect all day long. A setting spray will help your makeup last longer and maintain the smoky effect throughout the day.
Read more about How to Do a Simple Eyeliner Look
![Skincare Tips for Winter [Hydration Focus]](/static/images/29/2025-05/HydratingfromWithin3ATheRoleofDietandHydration.jpg)

![How to Dress for a Rainy Day [Stay Stylish & Dry]](/static/images/29/2025-05/AccessorizingforAddedProtectionandStyle.jpg)


![Best Facial Cleansing Brushes [Review]](/static/images/29/2025-05/Top-RatedCleansingBrushes3AOurExpertPicks.jpg)
![Review: [Specific Denim Brand] Jeans Full Review](/static/images/29/2025-05/DurabilityandLongevity3AAWorthyInvestment.jpg)

![Review: [Specific Sock Brand] Fun Designs](/static/images/29/2025-05/SizingandFitConsiderations.jpg)
Hot Recommendations
- Grooming Tips for Your Bag and Wallet
- Best Base Coats for Nail Longevity
- How to Treat Perioral Dermatitis Naturally
- How to Use Hair Rollers for Volume
- How to Do a Graphic Eyeliner Look
- Best DIY Face Masks for Oily Skin
- Guide to Styling 4C Hair
- Guide to Improving Your Active Listening Skills
- How to Fix Cakey Foundation
- Best Eye Creams for Wrinkles